Command-line interface#
You can deploy applications using the command-line interface. First, install the package:
pip install ploomber-cloud
Then, set your API key (learn how to get it):
ploomber-cloud key YOURKEY
You can also set your API key by setting the environment variable:
export PLOOMBER_CLOUD_KEY=YOURKEY
Tip
pc is a shortcut for ploomber-cloud. Example: pc key
Initialize a new app#
If you want to create a new app, run the init command:
ploomber-cloud init
This will prompt you for the project type (if this is a Docker-based project and you already have a Dockerfile, it’ll ask you for confirmation).
Once the command exits, you can deploy:
ploomber-cloud deploy
The deploy command will print a URL that you can visit to track deployment progress. If you would like to track progress in the command line,
you can add the --watch flag or the --watch-incremental flag.
ploomber-cloud deploy --watch
ploomber-cloud deploy --watch-incremental
When deploying from the terminal, it’s recommended to use the --watch option. This flag clears the terminal before printing updated logs, ensuring a clean display. Alternatively, if you’re storing deployment output in a file, such as with GitHub Actions, opt for --watch-incremental. This option skips clearing the screen and only prints new logs and status updates.
Configure an existing project#
If you want to deploy an existing project run the init command with the --from-existing flag:
ploomber-cloud init --from-existing
This will prompt you to choose from a list of your existing projects.
Upon your choice, the command will generate a ploomber-cloud.json with your project’s info. For example, if my app ID is cool-tree-1860 and I’m deploying a docker app:
{
    "id": "cool-tree-1860",
    "type": "docker"
}
Then, execute:
ploomber-cloud deploy
Force initialize an app#
You might want to re-initialize your project in case the ploomber-cloud.json file has got corrupted or doesn’t contain the valid keys.
Then run the init command with the --force flag:
ploomber-cloud init --force
This will replace the existing ploomber-cloud.json with a new one, with a different id field.
It can also be combined with the --from-existing for re-initializing from an existing project:
ploomber-cloud init --from-existing --force
Delete an app#
For deleting a particular app run the delete command with the --project-id flag:
ploomber-cloud delete --project-id <project-id>
You can also delete a project without passing the ID by running the delete command from within the initialized project folder:
ploomber-cloud delete
To delete all apps:
ploomber-cloud delete --all
It should display a confirmation message:
Are you sure you want to delete all projects?
This action is irreversible and cannot be undone.
Pressing forward with this will result in a loss of all project data and configurations.
If you're unsure or wish to reconsider, please cancel immediately by pressing Ctrl + C. [y/N]:
Confirm with y to delete all projects in your account.
Deploying an example#
Ploomber Cloud hosts example applications for many different frameworks. To download and deploy one, run ploomber-cloud examples:
ploomber-cloud examples
Follow the prompts to choose a framework and specific example name. You may also specify a directory in which to download the example.
Once the application is downloaded, it’s ready to deploy! For example, if you downloaded the basic-app example for Flask in the current directory:
ploomber-cloud key YOUR-KEY
cd basic-app
ploomber-cloud init
ploomber-cloud deploy --watch
If you already know which example you want, you can download it while avoiding prompts with ploomber-cloud examples framework/example-name:
ploomber-cloud examples flask/basic-app
A full list of example applications is available here
Monitor a deployment#
An application deployment can be monitored by using the watch command by passing a project_id and an optional job_id:
ploomber-cloud watch --project-id <project-id> --job-id <job-id>
You should be able to find the parameters from the deployment message. Here’s an example:
The deployment process started! Track its status at: https://www.platform.ploomber.io/applications/muddy-art-3373/8d1067be
Here, project-id is muddy-art-3373 and job-id is 8d1067be.
Configure an application using a template#
You can configure an application using a pre-defined template by running the command ploomber-cloud templates <template-name>.
Note that currently only the template vllm is supported.
This command should be run in an empty folder. Click here to learn more about deploying vLLM.
Configure GitHub action#
If your project is hosted on GitHub, you can configure an action for triggering project deployment everytime code changes are pushed.
For configuring a GitHub action through CLI run the command:
ploomber-cloud github
On confirming with y the CLI will create a ploomber-cloud.yaml file in the path .github/workflows.
Click here to learn more about configuring a GitHub action.
Defining secrets#
If your project uses secrets, you can define them in an .env file.
Important
If you are deploying using GitHub actions, do not upload your .env file to GitHub. Instead, follow the instructions here.
In your main project directory, create an .env file. Open it in your code editor, and enter your secrets. It should look like this:
MY_SECRET_1=value_1
MY_SECRET_2=value_2
Now make sure your project has been initialized, and deploy it:
ploomber-cloud deploy
The command-line interface will automatically read and encrypt your secrets and include them in the deployment.
For security reasons, your .env file is replaced with an empty file at runtime. Ploomber only stores your encrypted secrets.
To learn how to read your secrets from within your application, see Reading secrets.
Without an .env file#
You may also define secrets in your ploomber-cloud.json and Ploomber Cloud will read them from your environment variables. Here are the steps:
Set secrets as environment variables using
export key=valueDefine secret keys in
ploomber-cloud.jsonundersecret-keysDeploy via
ploomber-cloud deploy
For example, if I had two secrets, key1 and key2, I would first set them as environment variables:
export key1=val1
export key2=val2
Then I would edit my ploomber-cloud.json to look like this:
{
    "id": "project-id-1999",
    "type": "project-type",
    "secret-keys": ["key1", "key2"]
}
Now run ploomber-cloud deploy. You should see the secrets included with this message:
Adding the following secrets to the app: key1, key2,
Some important notes:
secret-keysshould be defined as a list of strings that only includes the keys (not the values) of each secretIf your secrets are defined in both an
.envandsecret-keys, the deployment will fail. You may only use one method.Make sure to define each secret as an environment variable AND in your
ploomber-cloud.json.If a secret is defined in
ploomber-cloud.jsonbut isn’t set as an environment variable, the deployment will fail.If a secret is set as an environment variable but isn’t defined in
ploomber-cloud.json, that secret won’t be included in the deployment.
Configure resources#
You can customize the amount of CPUs, RAM, and GPUs that your project will use with this command:
ploomber-cloud resources
If your ploomber-cloud.json file already has a resources section, you can reconfigure with the --force flag:
ploomber-cloud resources --force
Carrying over resources#
When you initialize a project using --force or --from-existing, your resources are carried over.
ploomber-cloud init --force will carry over the resources from the ploomber-cloud.json file.
ploomber-cloud init --from-existing and ploomber-cloud init --from-existing --force will carry over the resources that the project was most recently deployed with.
If you run any of these commands, be sure to double check your resources by checking the ploomber-cloud.json or running ploomber-cloud resources.
You can easily reconfigure them with:
ploomber-cloud resources --force
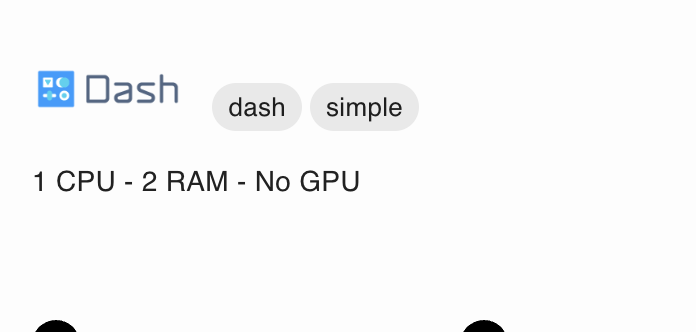
Add labels#
You can add labels to your project by running:
ploomber-cloud labels --add label_1 -a label_2
The labels will be added to the ploomber-cloud.json file like so:
{
    "id": "broken-night-1393",
    "type": "dash",
    "labels": [
        "dash",
        "simple"
    ]
}
Labels can be added either after ploomber-cloud init or ploomber-cloud deploy. Once the project is deployed the labels will reflect in the UI:
When you initialize a project using --force, the labels already configured will be carried over.
Delete labels#
To delete a label you can run:
ploomber-cloud labels --delete label_1 -d label_2
You can also add and delete labels at the same time:
ploomber-cloud labels --add label_1 --delete label_2
View labels#
To view all labels added to your project simply run:
ploomber-cloud labels
Switching the configuration file#
By default, the CLI reads and writes to a ploomber-cloud.json file, but you can customize it via the --config (or its short version, -c), switching the config file is useful when you need to manage multiple environments (for example, development and production).
All commands that read or write the config file accept the --config/-c argument, for example:
# create the config file in ploomber-cloud.dev.json
ploomber-cloud init --config ploomber-cloud.dev.json

# deploy using the dev config
ploomber-cloud deploy --config ploomber-cloud.dev.json