Password protection#
Important
Password protection is only available for Pro users.
Ploomber Cloud allows you to protect your apps with a password; our solution is compatible with most web frameworks.
Note
To enable password protection for Chainlit apps, see here.
To enable it, simply turn the option on and set a user and a password:

Important
Your password isn’t visible after deployment so write it down!
Auth0 authentication#
Important
The Auth0 integration is only available for customers in the Teams plan. If you’re interested in learning more, contact us at contact@ploomber.io
The password protection feature allows a single set of credentials (username and password); for a more scalable authentication solution, we provide an integration with Auth0. The authentication layer is transparent to your application (there is no need to modify your code), and you only need to supply your Auth0 configuration parameters.
Deployment#
You can get started by downloading the files from the sample Streamlit app. Ensure you have an API key. before continuing:
# ensure you set an API key before continuing
ploomber-cloud key YOUR KEY

ploomber-cloud examples streamlit/app-with-auth0
# type enter
cd app-with-auth0/
Now, let’s add the Auth0 integration:
ploomber-cloud templates auth0
The Auth0 template requires your project to be initialized. If it hasn’t been initialized yet, you can initialize it on the spot. You should see something like this:
Project must be initialized to continue. Would you like to initialize? [y/N]: y
Initializing new project...
Inferred project type: 'your-project-type'
Is this correct? [y/N]: y
Your app 'project-name-1999' has been configured successfully!
To configure resources for this project, run 'ploomber-cloud resources' or to deploy with default configurations, run 'ploomber-cloud deploy'
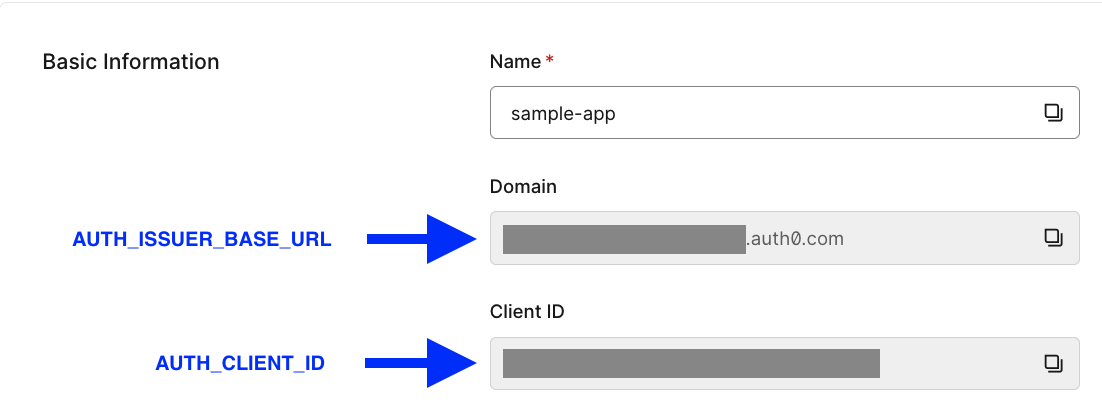
If your project has already been initialized, you won’t see this. You’ll then be prompted to enter three credentials from Auth0:
AUTH_CLIENT_IDAUTH_ISSUER_BASE_URL
These can be obtained from your Auth0 application page. If you haven’t yet created an application, log into Auth0 and create one. Then find the credentials here:
Once you’ve entered your credentials, you should see a confirmation like this:
Successfully configured auth0. To deploy, run 'ploomber-cloud deploy'
Note
If you already created an .env file, these credentials have been be saved there (along with your other secrets). If you haven’t, one has been be created for you with the credentials saved.
Now, run ploomber-cloud deploy to deploy your project.
Note
There is a third secret we automatically generate for you: AUTH_SECRET. You can
edit it by updating the .env file. This secret is used to sign your session tokens.
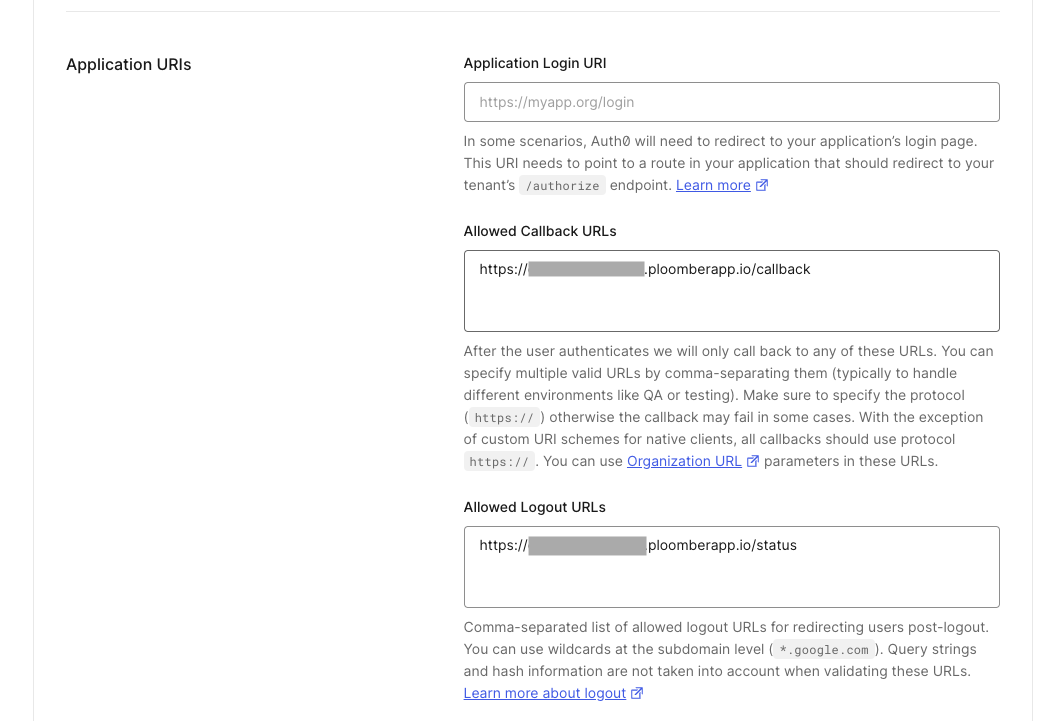
Set /callback and /status URLs#
Almost done! We just need to set the /callback and /status URLs for your Auth0 app. Navigate to your Ploomber project’s application page and copy the application URL. It should look like https://application-name-1999.ploomberapp.io.
Now, go back to the Auth0 application page and scroll down to Application URIs. Set these values:
Allowed Callback URLs:
https://application-name-1999.ploomberapp.io/callbackAllows Logout URLs:
https://application-name-1999.ploomberapp.io/status
It should look like this:
Tip
If you ever re-initialize and deploy your app under a different name, you’ll have to update these URLs.
You’re all set! Once your application has finished deploying, click View Application. You should be met with Auth0 authentication:
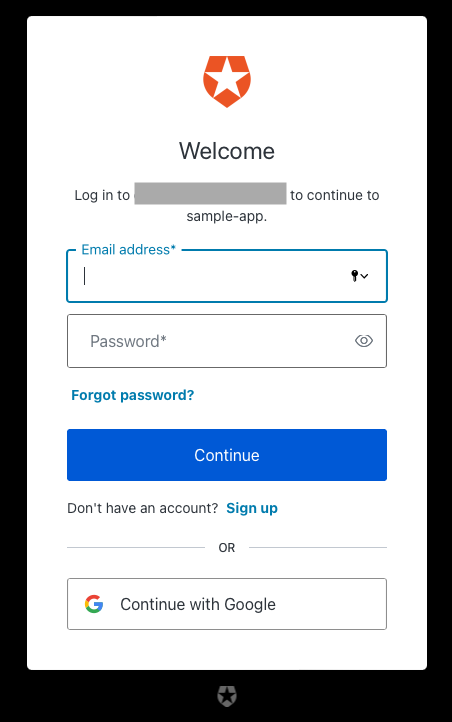
Simply sign up and then login and you’ll be re-directed to your application.
Knowing who logged in#
To know which user logged in, you can read the following headers:
X-Auth-Name: returns the user’s emailX-Auth-Sub: returns the user ID (as identified by Auth0)
You can see some sample Streamlit code here.
Logging out#
To log out a user, you can create a link to the /logout endpoint.
Here’s an example using Streamlit:
import streamlit as st

st.markdown("[Logout](/logout)")
If using Panel:
import panel as pn

logout_link = pn.pane.Markdown("[Logout](/logout)")
Using a custom domain/subdomain#
If you want to serve your Auth0-protected app from a custom domain, or subdomain. Follow these steps:
Follow the instructions to configure a custom domain/subdomain
Update your Auth0 configuration to match your domain/subdomain.
Modify your
.envfile (must have been generated the first tiem you deployed), add a newAUTH_BASE_URLenvironment variable, whose value should be the domain/subdomain you configured (e.g.,https://subdomain.example.com), and re-deploy your project