GitHub deployment#
You can use GitHub Actions to deploy your project on each push.
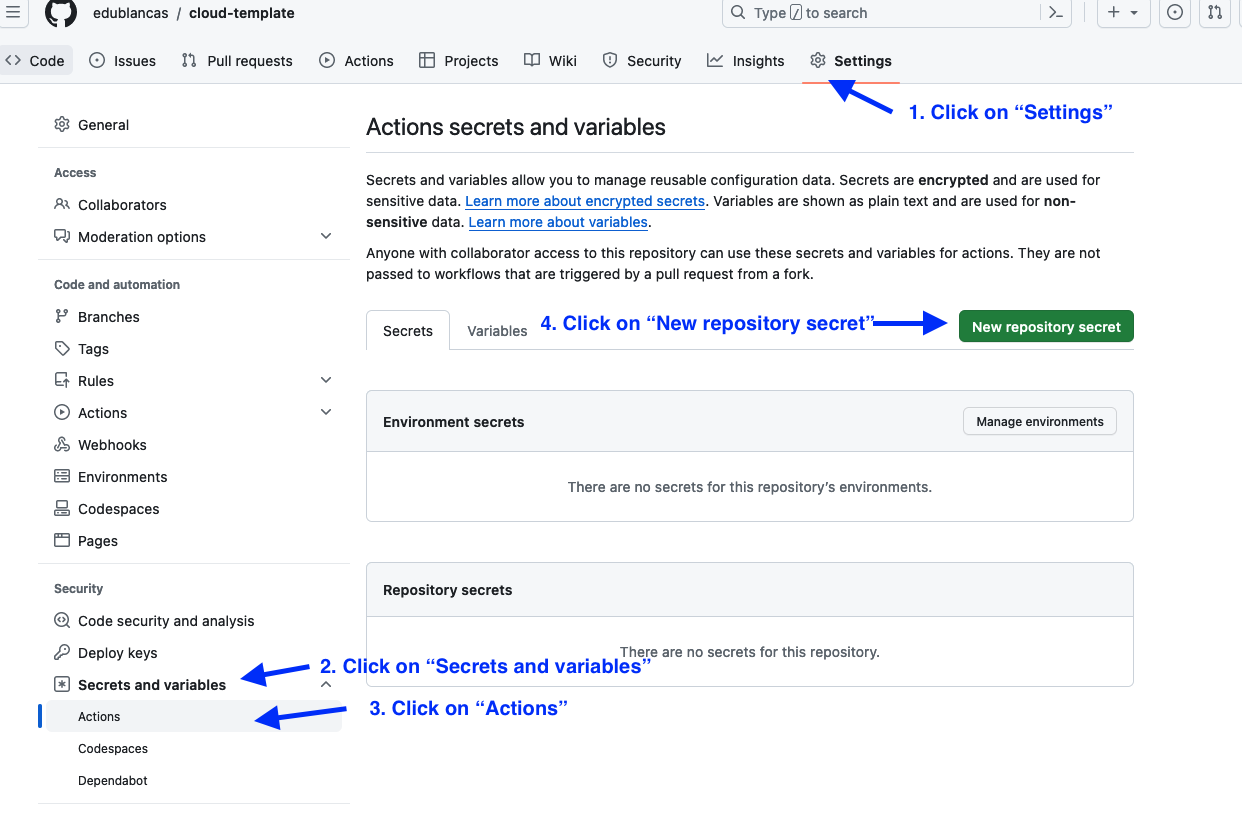
Set GitHub secret#
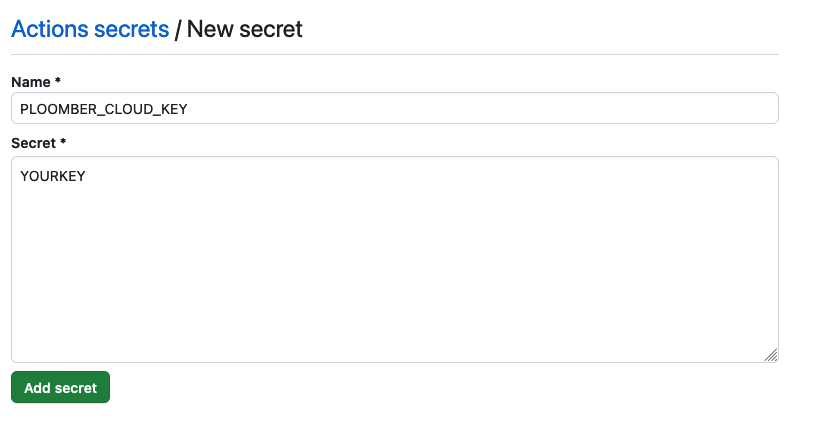
First, you need to get your API key. Once you have the API key, you need to store it as a GitHub secret in your repository:
Initialize project#
Then, install the CLI:
# install package
pip install ploomber-cloud
And set the API key locally:
ploomber-cloud key YOURKEY
You can also set your API key by setting the environment variable:
export PLOOMBER_CLOUD_KEY=YOURKEY
Now, configure your project:
ploomber-cloud init
init will create a ploomber-cloud.json file. For more information on the init command, see Command-line interface
Configure and monitor GitHub actions#
Now, configure GitHub actions by adding this YAML file in .github/workflows/ploomber-cloud.yaml
Finally, commit and push the new files:
# commit ploomber cloud and github actions config files
git add ploomber-cloud.json .github/workflows/ploomber-cloud.yaml
git commit -m 'configure github actions deployment'
git push
Once you push, you can monitor progress from GitHub. First, go to the actions section:
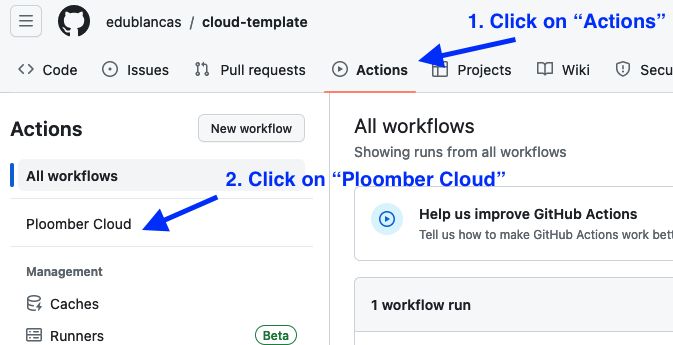
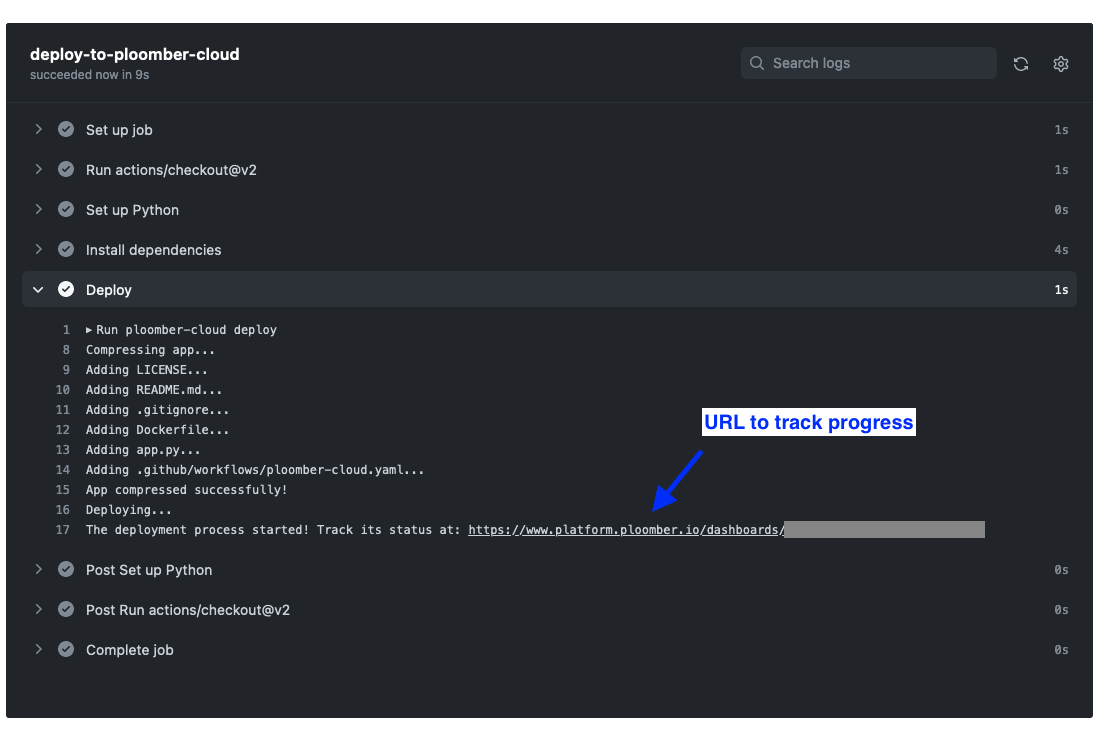
Then, click on the most recent run, and you’ll see the logs:

In the logs, you will see updates on the progress of the deployment. You’ll also see a URL to your application where you can check its status. Once the deployment has succeeded, it will return a URL to view your deployed project.

If you would prefer to track progress only through the application UI, you can remove --watch-incremental from the deploy command in your ploomber-cloud.yaml:
 - name: Deploy
        env:
          PLOOMBER_CLOUD_KEY: ${{ secrets.PLOOMBER_CLOUD_KEY }}
        run: |
          ploomber-cloud deploy # removed '--watch-incremental' here
Removing --watch-incremental means deployment updates won’t be output to the logs, but you will still be able to track its progress through the URL.
Without --watch-incremental, the logs will look like this:
A complete sample project is available here.
Configure action through CLI#
If your project is already hosted on GitHub, running ploomber-cloud github inside your repository folder will prompt configuring a GitHub action for project deployment.
On confirming with y the CLI will create a ploomber-cloud.yaml file in the path .github/workflows.
Ensure that the Ploomber Cloud API Key is set as described in this section.
Please confirm that you want to generate a GitHub workflow file [y/N]: y
'ploomber-cloud.yaml' file created in the path .github/workflows.
Please add, commit and push this file along with the 'ploomber-cloud.json' file to trigger an action.
For details on configuring a GitHub secret please refer: https://docs.cloud.ploomber.io/en/latest/user-guide/github.html
To trigger an action for deploying the project using GitHub actions you need to add, commit and push this file along with the ploomber-cloud.json.
Once done, you can monitor progress as discussed above.
In case the workflow template has been updated, running ploomber-cloud github will prompt the user to confirm updating the file:
Please confirm that you want to update the GitHub workflow file [y/N]:
On confirming with y the CLI will replace the workflow file with the updated one.
Additionally, users are also notified of GitHub workflow file creation or updation as needed while initializing or deploying a project.
If no workflow file is present, running ploomber-cloud init or ploomber-cloud deploy would display the following information:
You may create a GitHub workflow file for deploying your application by running 'ploomber-cloud github'.
To learn more about GitHub actions refer: https://docs.cloud.ploomber.io/en/latest/user-guide/github.html
If workflow needs an update a relevant message will be displayed:

Please review the workflow file and update if needed.
Secrets#
To avoid uploading an .env file to GitHub, you may define them in your ploomber-cloud.json and Ploomber Cloud will read them from your repository secrets. Here are the steps:
List the secret keys in
ploomber-cloud.jsonundersecret-keysSet the secrets in your GitHub repository and define them in your
ploomber-cloud.yamlfilePush your code to deploy
For example, if you had two secrets, key1 and key2, you should edit your ploomber-cloud.json to look like this:
{
  "id": "project-id-1999",
  "type": "project-type",
  "secret-keys": ["key1", "key2"]
}
Set key1 and key2 as secrets in your GitHub repository using the same method you did for your API key. Now make sure to define them in your ploomber-cloud.yaml file. Here’s an example snippet:
- name: Deploy
    env:
      PLOOMBER_CLOUD_KEY: ${{ secrets.PLOOMBER_CLOUD_KEY }}
      key1: ${{ secrets.key1 }}
      key2: ${{ secrets.key2 }}
    run: |
      ploomber-cloud deploy --watch-incremental
Finally, push your code. In your deployment logs, when ploomber-cloud deploy is ran, you should see the secrets included with this message:
Adding the following secrets to the app: key1, key2,
Some important notes:
secret-keysshould be defined as a list of strings that only includes the keys (not the values) of each secretIf your secrets are defined in both an
.envandsecret-keys, the deployment will fail. You may only use one method.Make sure to define each secret in GitHub, mention it in
ploomber-cloud.yaml, AND mention it inploomber-cloud.json.If a secret is defined in
ploomber-cloud.jsonbut isn’t set as a GitHub secret, the deployment will fail.If a secret is set in GitHub but isn’t defined in
ploomber-cloud.json, that secret won’t be included in the deployment.